Endpoint Scanning
Threatray provides agent-less and lightweight endpoint scanning to detect in-memory threats. The endpoint scanner’s goal is to automate and accelerate triage and compromise assessments.
The endpoint scanner is a PE binary designed to scan an endpoint in a few minutes. Its primary focus lies in detecting in-memory threats by scanning each running process for suspiciously loaded memory that could harbor malicious code. The scanner does not collect any files from disk, nor code that was loaded in a legitimate way, e.g. load a malicious DLL from disk.
The scanner can be deployed seamlessly on individual or thousands of endpoints, either as a standalone binary or through integrations with EDR and IR products. The scanner supports Windows 7 to 10 (64-bit) systems and can scan endpoints with no or restricted internet access.
Each scan completes within minutes on the endpoint, automatically uploading collected memory dumps to your private Threatray instance for analysis, where results will be available shortly after the scan. Only memory containing code is gathered and analyzed, no full memory dumps or non-executable data that might contain privacy-sensitive information is collected.
Get the endpoint scan binary
The initial step involves generating a new endpoint scan binary. You can create a new binary through the UI by accessing the Endpoint scan binaries menu item and clicking Generate new binary. Alternatively, it can also be generated via the API, as detailed in the API usage section.
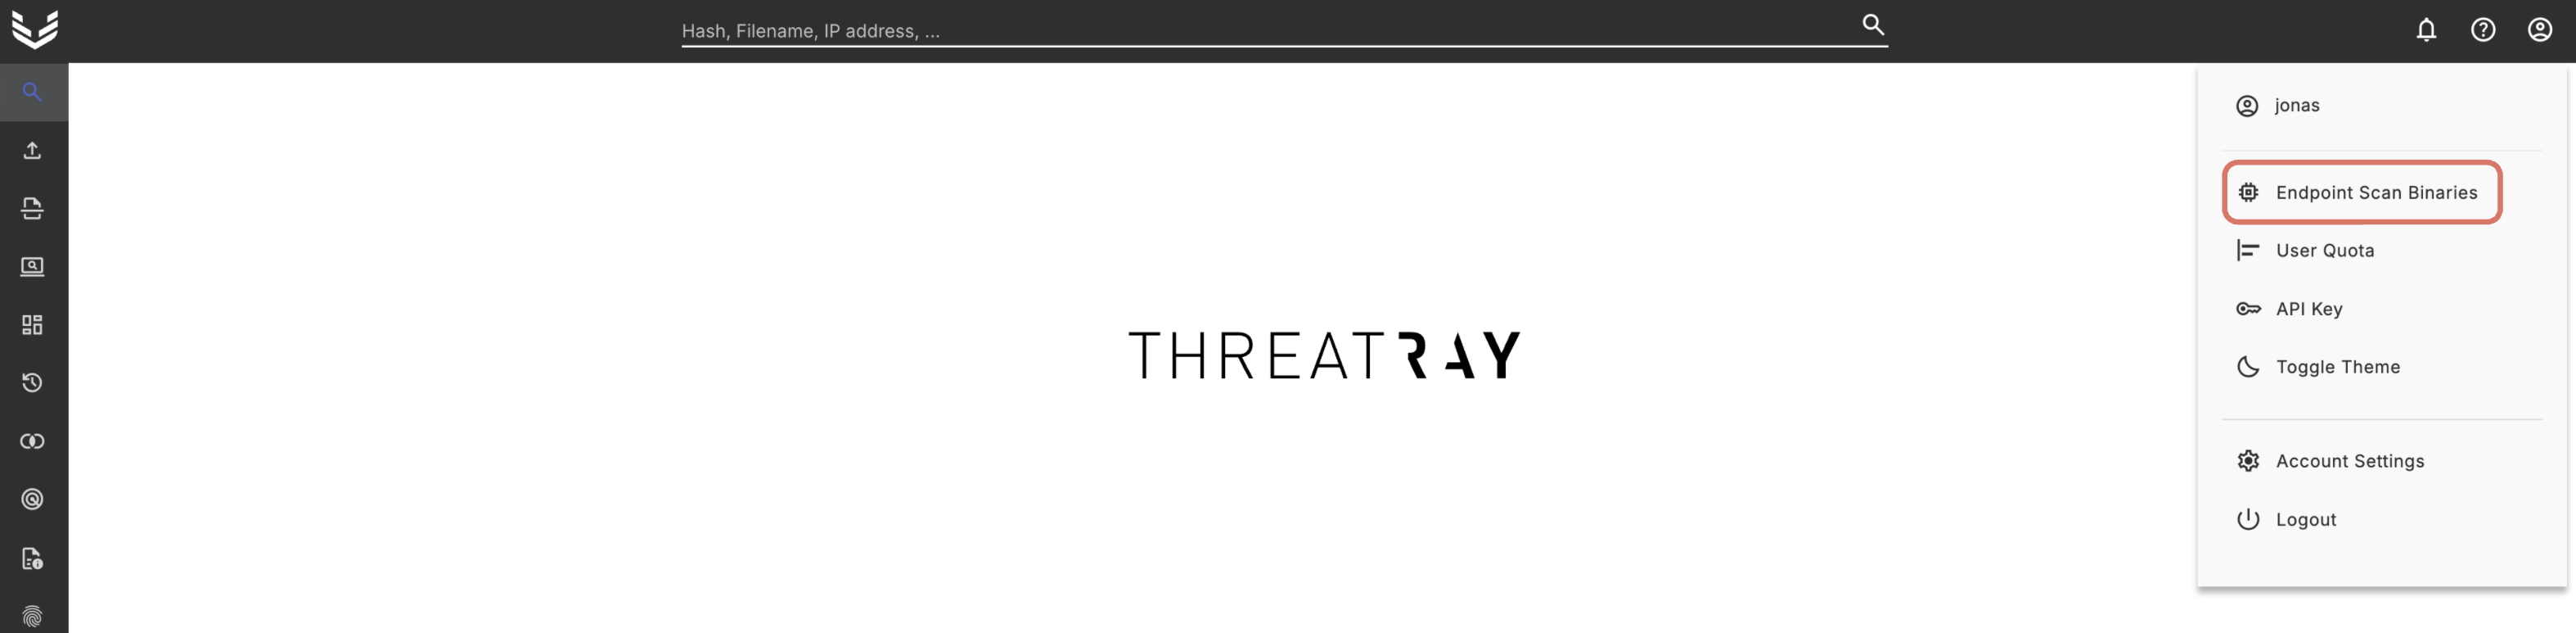
As a security measure, given that these binaries execute on potentially compromised systems, they are considered disposable and have a limited lifespan. Each generated binary remains valid for one year and after the expiration date has passed, a new binary needs to be generated. It is possible to immediately deactivate a binary before its expiration date.
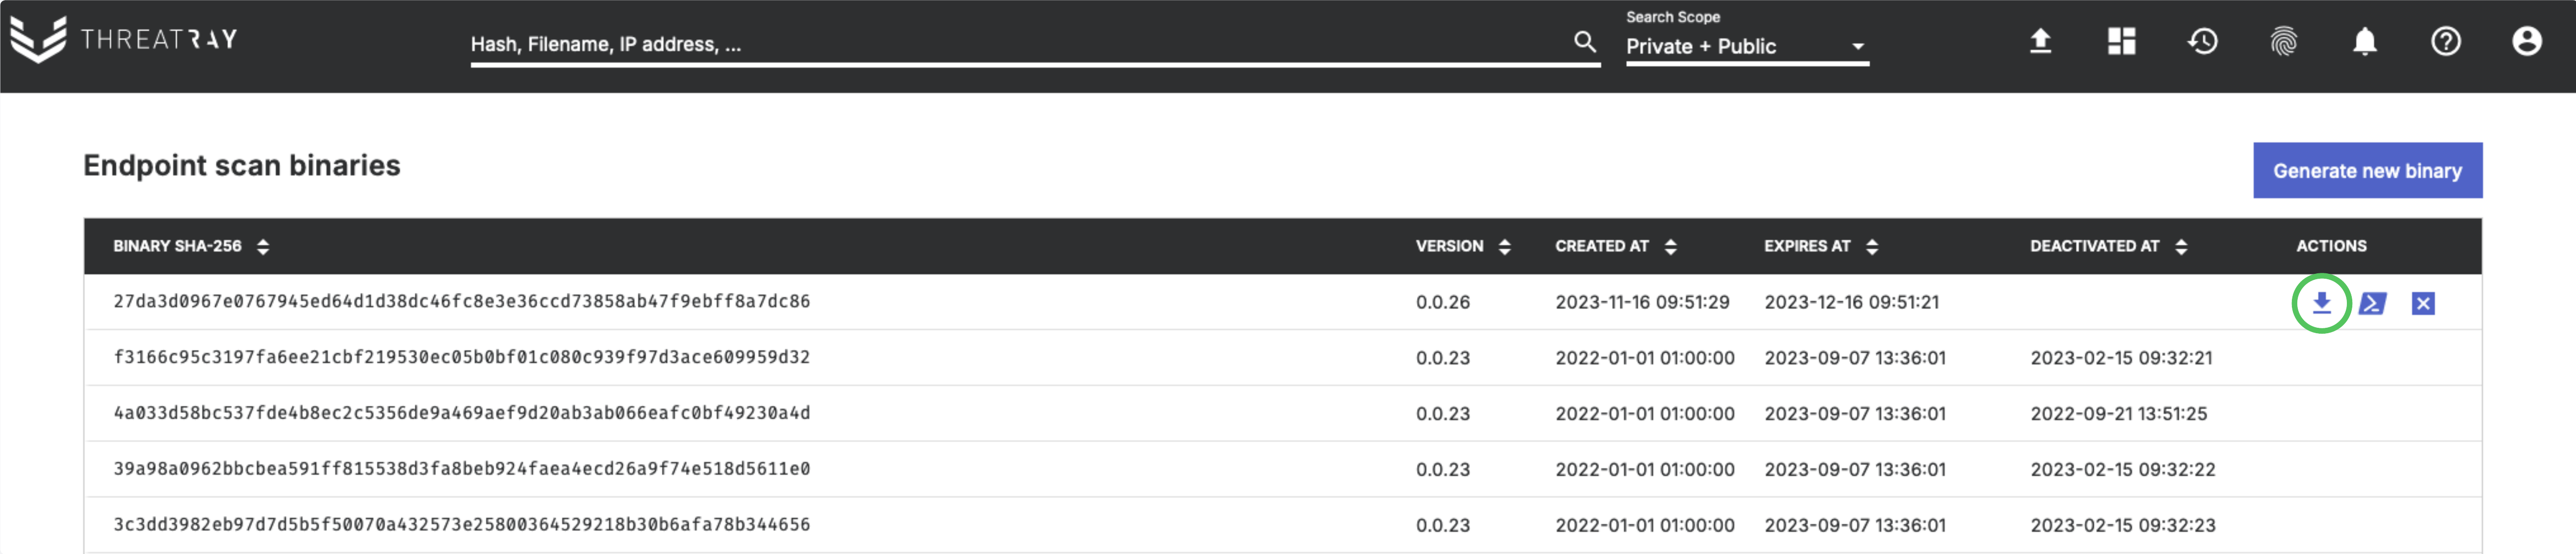
Click the Download binary button to download the binary.
Deployment and launch
The binary needs to be deployed on the endpoint that is to be scanned. There are options to remotely deploy the binary and these are discussed in subsequent sections. In this section, we discuss standalone usage.
To get full functionality, it’s advised to run the binary with elevated privileges. Otherwise, it might lack permissions to scan the memory of all processes.
The endpoint must be able to communicate with *.threatray.com:443 to upload data to Threatray for analysis. If this isn’t feasible, refer to the guide in the section titled Scanning an endpoint with restricted internet access.
Launching the binary is possible via double-clicking the file or using the Windows command line or PowerShell. Once launched, the binary logs its progress to the standard output.
c:\temp\threatray_endpoint_scan.exe
[endpoint scan] Work directory C:\Users\bob\AppData\Local\Temp\
[endpoint scan] Log path: C:\Users\bob\AppData\Local\Temp\scan-2024-06-06-20-41-06.log
[endpoint scan] Archive will be saved to C:\Users\bob\AppData\Local\Temp\threatray-endpoint-scan-archive.zip
[endpoint scan] Ignored processes:
[endpoint scan]
[endpoint scan] Created temporary directory: C:\Users\bob\AppData\Local\Temp\2024-06-06-20-41-06
[endpoint scan] Starting scan.
...
[endpoint scan] Created archive: C:\Users\bob\AppData\Local\Temp\threatray-endpoint-scan-archive.zip
[endpoint scan] Starting archive validation
[endpoint scan] Archive valid
[endpoint scan] Endpoint scan has completed, exiting.
The duration of system scanning typically lasts a minute or two, depending on the system’s activity level. The scan will only consume moderate system resources during that time. Upon completion, the gathered data is automatically uploaded to your private Threatray instance, unless the /skip-upload command-line flag is set.
Data collection per endpoint typically ranges from a few MB up to 100 MB per scan. The data collected during the scan is removed once the upload process is complete.
AV / EDR exclusions
As the scanner accesses process memory, certain AV/EDR products may flag it as potentially malicious. It’s recommended to exclude the scanner binary from any AV/EDR scanning.
The quickest way to add exclusions for Microsoft Defender on a single system is with the following commands. Change the path in -ExclusionProcess accordingly.
powershell -ep bypass -Command "Add-MpPreference -ExclusionProcess 'c:\temp\threatray_endpoint_scan.exe'"More information on exclusions can be found at https://learn.microsoft.com/en-us/defender-endpoint/configure-exclusions-microsoft-defender-antivirus.
Command line options
The binary offers various command-line options to adjust its runtime behavior:
- Specifying the location for temporary storage of memory dumps on disk.
- Excluding specific processes from scanning by providing their complete, case-insensitive process names (e.g.,
lsass.exeoronedrive.exe). - Skipping the upload of the archive. This feature is useful in environments lacking connectivity to
*.threatray.com:443. Manual submission of the archive is a necessary subsequent step. The path to the created archive can also be specified. - Manual configuration of an authenticated proxy. By default, the binary attempts to auto-detect the proxy from the environment, using NTLM-based authentication. However, if the binary runs under the SYSTEM account, manual proxy configuration might still be required due to potential limitations with NTLM-based authentication.
- Disabling SSL/TLS X.509 certificates verification and disabling certificate revocation list checks.
- Setting network throttling for archive upload stage.
- Adjusting the processing priority for the backend. The default value for all submissions through API and UI is 5; lowering it prioritizes other submissions ahead.
- Assigning a label for the analysis in Threatray.
- Running a quick scan, which completes faster but does not scan for shellcode implants.
The /help command-line flag lists the available parameters:
C:\Program Files\Downloads>threatray_endpoint_scan.exe /help
---

Optional:
/archive-file-path <string>
         : Path where the endpoint scan archive should be saved
/disable-ssl-verification
         : Disable SSL/TLS verification.
/disable-crl-check
         : Disable certificate revocation list check.
/label <string>
         : Set the label of the analysis.
/limit-rate <string>
         : Upload rate limit, by default in bytes. You can add k, m, g to the number to set the limit in kilobytes, megabytes or gigabytes per second.
Example: 200k limits uploads to 200 kilobytes per second, 1m limits to 1 megabyte per second.
/priority <integer: decimal, or hexadecimal with '0x' prefix>
         : Set the processing priority for the backend from 1 (low) to 10 (high)
/processes-to-ignore <list: separated by ';'>
         : Do not scan process/es with given name/s. Names should be split by ';'
/proxy <string>
         : Set the proxy URL with the protocol, for example: http://proxy.intranet:3128
/proxy-auth-password <string>
         : Set the password if the proxy is authenticated.
/proxy-auth-user <string>
         : Set the user if the proxy is authenticated.
/quick-scan
         : SEnable quick scan mode (skip shellcode scanning).
/skip-upload
         : Skip uploading the created analysis archive for analysis. Useful for system with restricted internet access.
/work-directory <string>
         : Working directory (where all the temporary files will reside). If not specified defaults to the TEMP directory.
/debug
         : Emit debug messages to the log.

Info:
/help
         : Print complete help.
/help <string>
         : Print help about a given keyword.
<param> ?
         : Print details of a given parameter.
           Example: /disable-ssl-verification ?
/version
         : Print version info.
---
Scanning an endpoint with restricted internet access
When an endpoint lacks access to *.threatray.com:443, scanning can be initiated without any upload. In this scenario, the binary generates an archive locally, intended for subsequent manual upload to Threatray.
To initiate a scan without uploading, use the /skip-upload flag. Upon completion, the console output will provide the path to the archive file. Additionally, you can specify the location for the archive using the /archive-file-path <string> parameter.
c:\temp\threatray_endpoint_scan.exe /skip-upload /archive-file-path c:\temp\scan\2024-06-06-20-41-05.zip
[endpoint scan] Work directory C:\Users\bob\AppData\Local\Temp\
[endpoint scan] Log path: C:\Users\bob\AppData\Local\Temp\scan-2024-06-06-20-41-06.log
[endpoint scan] Archive will be saved to c:\temp\scan\archive.zip
[endpoint scan] Ignored processes:
[endpoint scan]
[endpoint scan] Created temporary directory: C:\Users\bob\AppData\Local\Temp\2024-06-06-20-41-06
[endpoint scan] Starting scan.
...
[endpoint scan] Created archive: c:\temp\scan\2024-06-06-20-41-05.zip
[endpoint scan] Starting archive validation
[endpoint scan] Archive valid
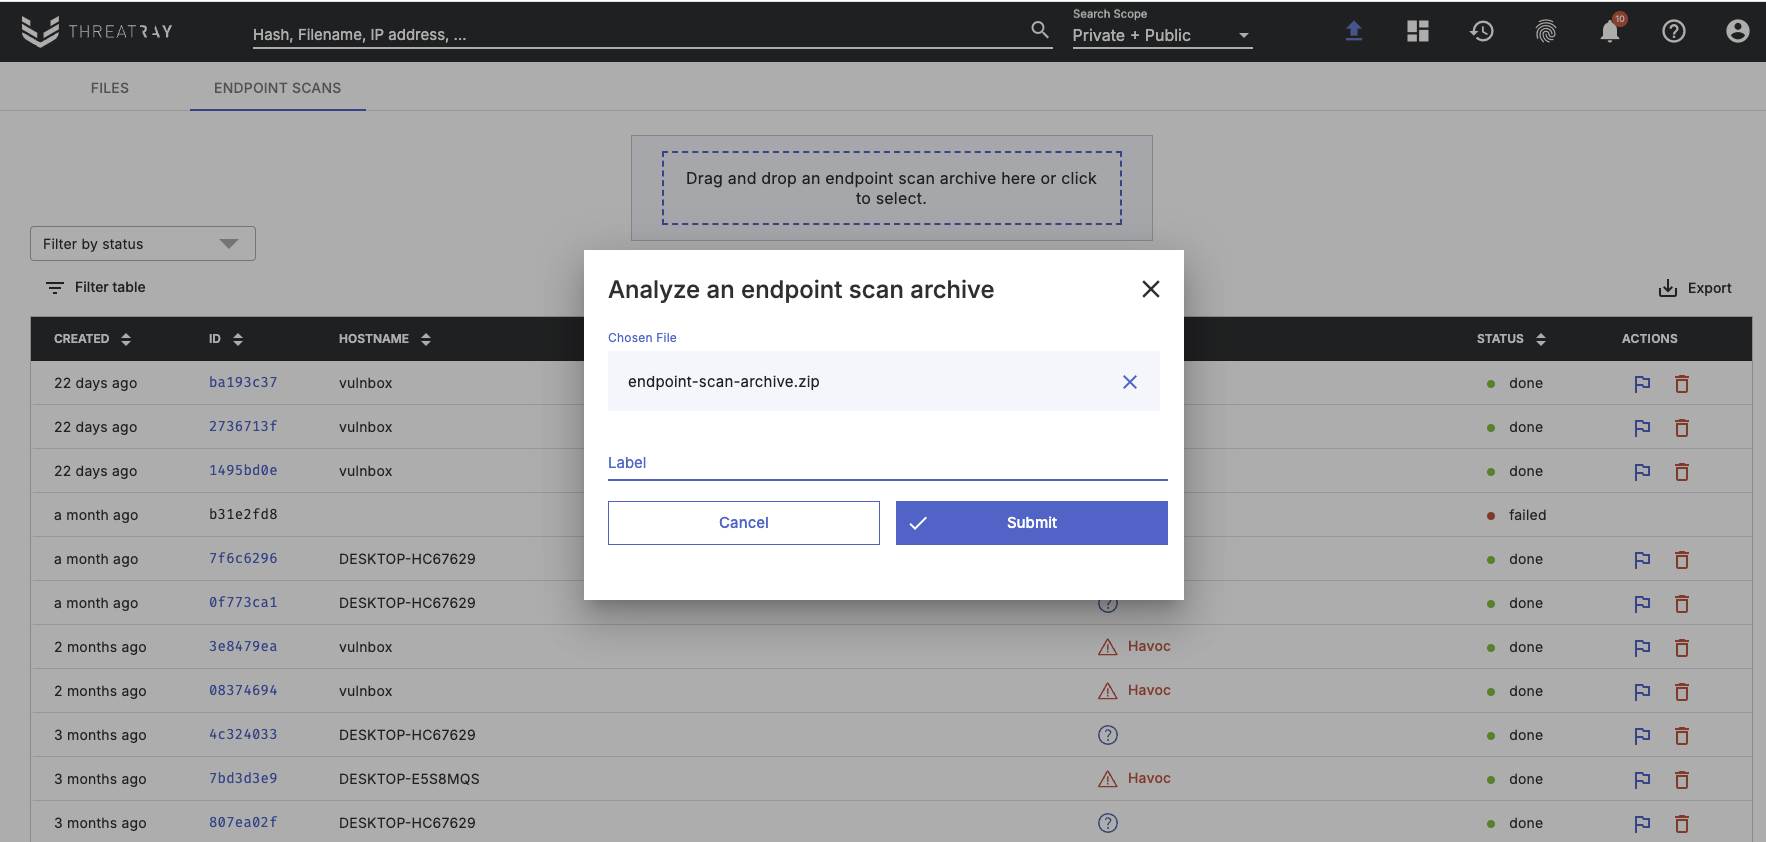
[endpoint scan] Endpoint scan has completed, exiting.The resulting archive file can be uploaded through the UI or the API.
Analysis results
After a scan on an endpoint has finished, you can locate a new analysis under the Endpoint scans tab within the UI:
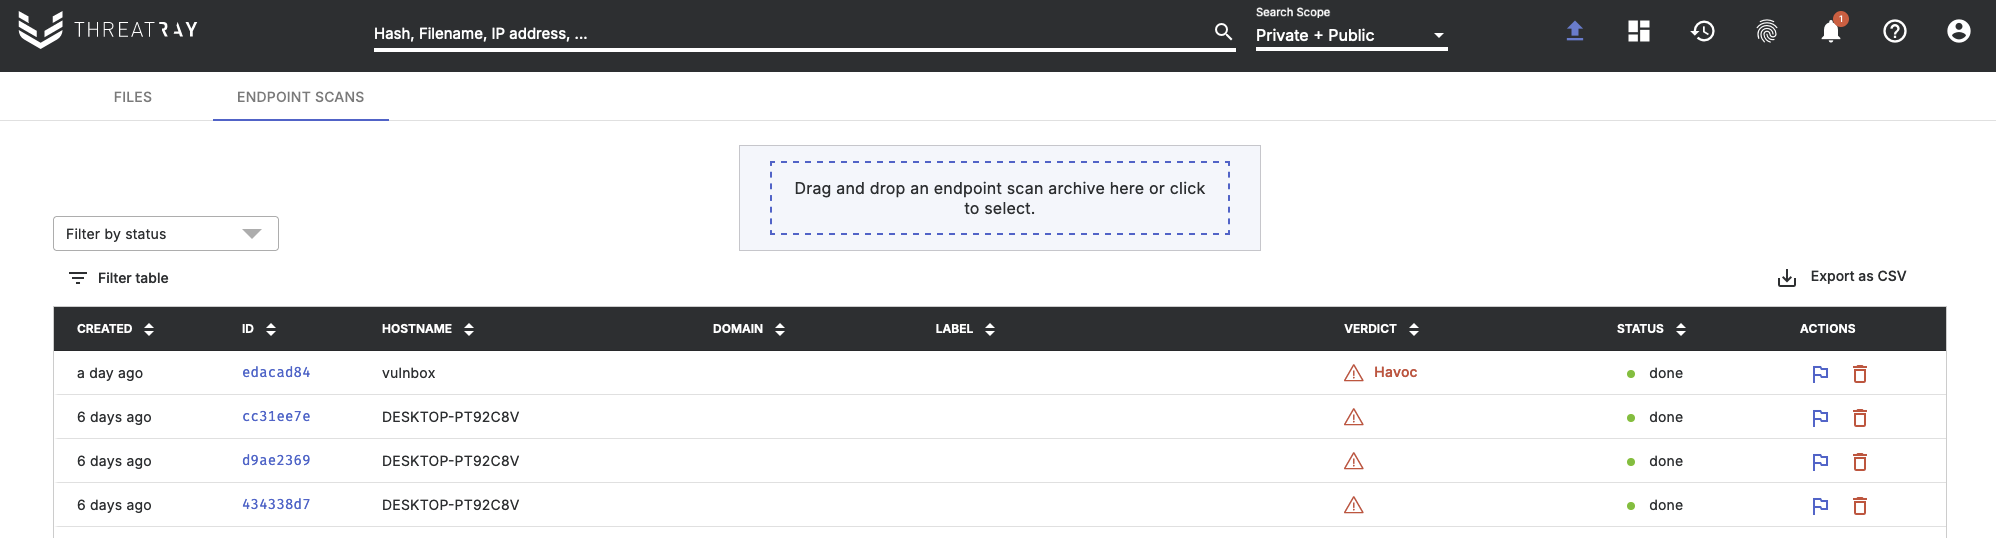
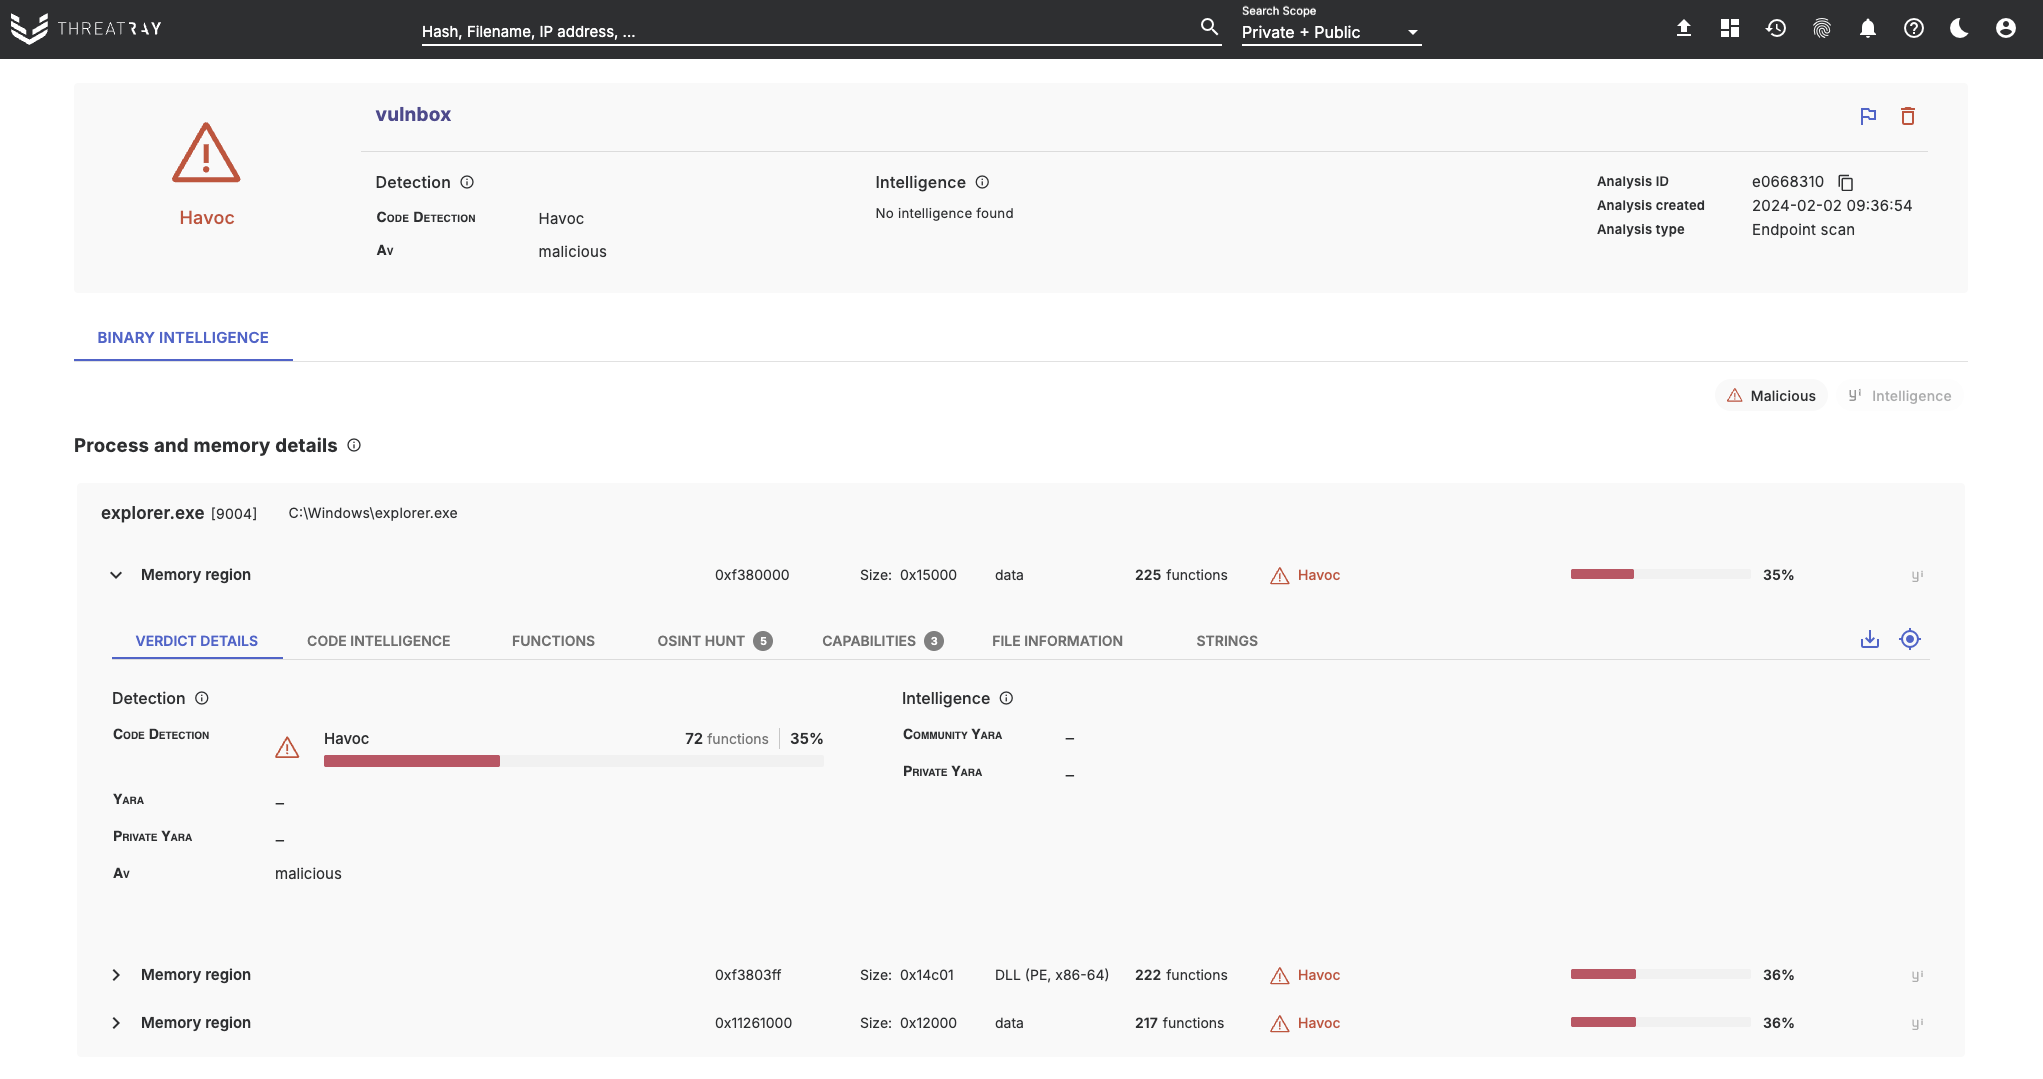
Once the analysis has completed, its results can be viewed. The analysis report contains the same richness and depth as any other Threatray analysis:
API usage
The process of generating new endpoint scan binaries and uploading endpoint scan archives from endpoints is possible through the API. To get started, the simplest method is to utilize our API kit available at https://threatray.com/api-examples. Follow the README instructions provided to set it up.
Within the API kit, you’ll find a script called scripts/endpoint_scan_manager.py, specifically designed to handle and manage endpoint scans.
Example - Create and download a new binary
$ source ./venv/bin/activate
$ python3 endpoint_scan_manager.py create-binary
created new binary, hash: 5b33b38fe486c969f8c88e01fda7efed2e55007edbcfb076595211ea97b89ae2
$ python3 endpoint_scan_manager.py download-binary --sha256 5b33b38fe486c969f8c88e01fda7efed2e55007edbcfb076595211ea97b89ae2
Example - Upload an archive for analysis
$ source ./venv/bin/activate
$ python3 scripts/endpoint_scan_manager.py upload --file-path /path/to/archive.zip --label case-123
Updated 9 months ago